One of my 2020 goals is to bake more. It’s all thanks to my aunt who’s so kind and has gifted me a stand mixer for Christmas. However, no, you don’t need to own an expensive stand mixer in order to start baking.
When I think of bread, my mind goes back to childhood days when I would wait for a monthly release of my favorite manga, Yakitate!! Japan, written and illustrated by Takashi Hashiguchi. The story is about Kazuma Azuma, a boy on his quest to create “Ja-pan”, a national bread for the Japanese people. He posses the legendary Hands of the Sun where his hand temperature is warmer than a normal human hand, and that gives him an advantage in helping the dough ferment faster. But it’s his passion and drive that really ignites the bread-making passion in little me back then.
I don’t remember finishing the manga nor do I ever think I’d get into bread-making one day.
In Vietnam, we have Banh mi, a French-inspired version of a baguette, and I think it’s hard to beat a good Banh mi. I’ve made baguettes once before, but just the thought of attempting something else rather than that has never occurred because it’s my favorite bread to eat. And about sourdough, I’m not a fan of its sour taste, especially when eaten cold. I decided to buy some white sourdough loaves at local bakeries and experimented with toast variations before attempting on making it myself. I’d have to agree, once the bread is lightly toasted, it’s delicious with almost everything and anything.
Thanks to the stand mixer from my aunt that gave me a reason to start baking more, my coworker’s starter to really force me to get started on the sourdough bread-making journey, and all of the free time I get during this quarantine, I finally give it a start. Yes, bread making is extremely intimidating at first, and the process seems complicated. But I promise you that once you start, it’s the most rewarding thing to make ever!

What is Sourdough or Sourdough Bread?
Sourdough Bread is made from flour, water, salt with the help of natural leavening agent aka yeast and lactobacilli (aka wild yeast, cultivated naturally from the air, water and flour during the fermentation process). The lactic acid produced by the lactobacilli gives it a sour taste, and flavors can range from mild to strong with chewy crumb (the inside of the bread) and crispy crust.
How to Make Sourdough Bread
I have taken my own notes and followed this Guide by Claire Saffitz on the NY Times. There are a lot of helpful Youtube videos, but this video of Brad and Claire from the BA Test Kitchen is especially helpful because I use Claire’s guide. Youtube has also recommended me to watch this video, and I thought it’s pretty well-explained for beginners as well.
Watch my Sourdough Bread making process and diary, HERE.
So far, I’ve done three batches, two with bread flour and whole wheat mixture and one with bread flour and spelt flour. All three were successful, but I prefer the whole wheat one over spelt flour in terms of flavor and texture. I don’t have a thermometer to control temperature, and rising time is different every time.
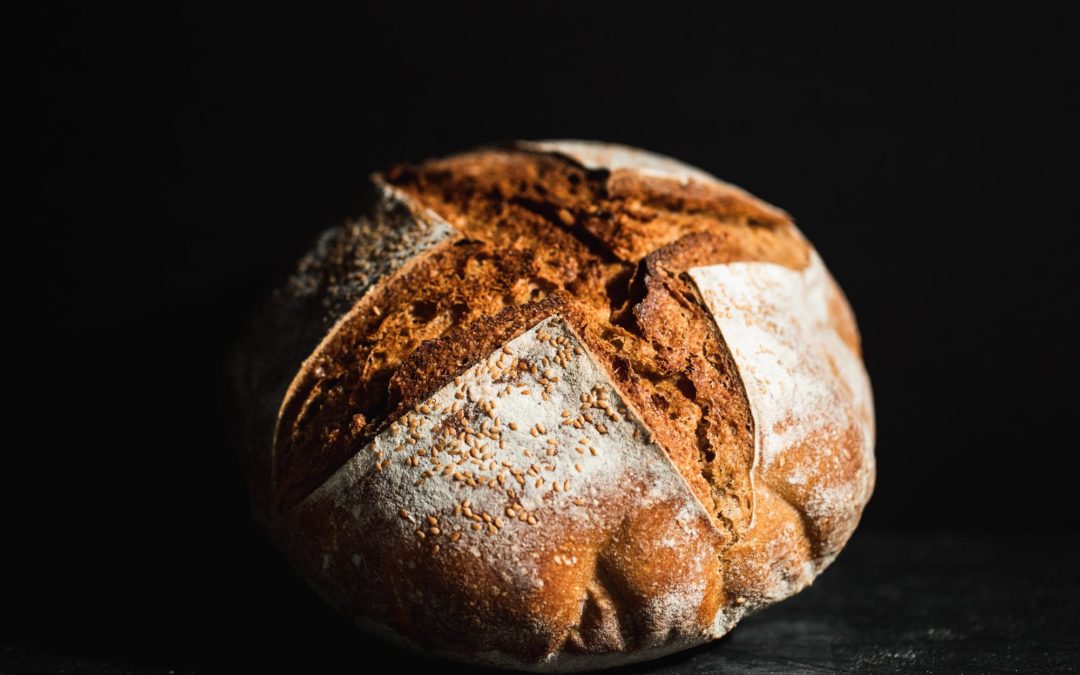
The third time, I used very warm water and let my dough (bread flour and spelt flour) ferment a lot longer, it was a sticky mess. I freaked out and had a really hard time trying to form my dough into balls. I ended up adding a lot of flour and my bread was quite dense. That’s a big no, but I’m glad I didn’t lose my patience and throw out my dough. Because look at how beautiful these loaves of bread turned out (bread photos featured in this post!) Please note that I would show you the scrum inside, but it was not my best attempt. So use bread flour and whole wheat before branching out to using other fancy flours.
What You’ll Need:
-
Sourdough starter (read more below)
-
A vessel or jar to store your starter, glass 3/4 – 1L jar, plastic container (tall to-go soup container with lid, a beer pint jar and cover it with a towel or plastic wrap)
-
Good unbleached, stone ground, organic flours are best. I use All-purpose flour and sometimes whole wheat flour to feed my starter. Dough made from white bread flour and whole wheat flour yields the best taste and texture. My all-purpose and Expresso Bread Flour are from a local mill, called Cairnspring Mills, and 100% stone-ground whole wheat bread flour is from the brand Bob’s Red Mill, largely available at many grocery stores.
-
Kosher salt or sea salt
-
Water
-
Instant-read thermometer – Use this to measure the water temperature and check the temperature of the area where you store your dough, the oven and the baking pan prior to baking.
-
Digital kitchen scale (in grams)
-
A large mixing bowl, ideally a glass bowl so that you can watch the dough rises with bubbles visible on the side. I have this stainless steel bowl.
-
Some kitchen towels – I have a bunch of these dish towels from Ikea, cheap and handy!
-
Plastic wrap
-
Flour sifter or a strainer
-
A Dutch oven is best to get the optimal oven spring aka the increase in size during baking (I have the 3.5 qt. Le Creuset, a bit small for my liking for sourdough, plus I have to remove the handle prior to baking. So I’m eyeing this 5 1/2 qt. Le Creuset one specifically for bread making. However, you don’t have to spend that much in order to make good bread. Lots of at-home bread makers really love this $40 cast iron cooker from Lodge.)
-
A blendable scraper tool (plastic or silicon)
-
2 banneton or brotform bread proofing basket (recommended! I have a 9-in round basket and a plastic scraper tool – come as a set, great as gifts. Round or oval shapes work fine)
-
A lame razor blade (pronounced “lahm,”) or a bread lame to score the bread prior to baking
-
Proofing box (optional! Many pros use a box to better control the temperature. I just let me dough rise in the oven, turn off with light on.)
-
Bread knife – This is crucial when it comes to slicing a beautifully thin piece of toast!


Sourdough Glossary
-
Sourdough Starter vs. Levain: Sourdough starter and levain are both preferments, a mixture of flour, water, and leavening agents, combined in advance of making bread dough. These two terms are often used interchangeably, but not all will yield the same pronounced sour flavors, a natural characteristic of traditional sourdough bread. Some even say levain happens when you take part of your starter to do something with it. Adding a starter or levain will help the dough rise. Many say it’s the life force of the bread.
Preferments can be made from commercial yeast or wild yeast and bacteria cultivated naturally from the air, water, and flour during the process of making sourdough starter. All sourdough starters are different due to many factors such as time, temperature, flour, and water people use, location, etc. You can make your own starter or levain from scratch, obtain it from a friend or someone you know, or you can buy it online (Etsy or King Arthur Flour).
-
Feeding Routine: You’d want to treat your Sourdough Starter like a ‘low maintenance pet’ by taking it out from the fridge once a week. Discard all but 25 g of starter. Many people weigh out their jar, by adding 25 g of the starter to the jar’s weight, they’d avoid having to transfer the starter to a new container. Stir in 100 g of tap water at room temperature to evenly disperse the starter. You can use a wooden stick or a chopstick for this step, but many people prefer using your hands to promote fermentation naturally! Then stir in 100 g of high-quality white bread flour (AP is ok!) until a smooth paste. Cover and leave it out until it’s fully risen and store it in the fridge to feed again next week. You can write the feeding date and time or set a timer on your phone, your choice.
-
Sourdough Discard: All starter feeding will require you to discard all current starter and leave just a small amount. Never throw out your sourdough starter! I love making blueberry and chocolate scones, scallion pancakes, and waffles with my starter discard.
-
Hydration is the ratio of water to flour when making bread dough. It’s often used or expressed as Baker’s Percentage. Don’t worry about this when starting out. Sourdough is a very wet dough. It is sticky, so for beginners, 70-75% hydration is best. Pro-bakers prefer hydration levels up to 80%. If your dough is too wet before dividing, sprinkle some flour and use the sides of your hand to shape your dough into a ball.
-
Autolyse refers to the resting stage after flour and water are mixed. This helps jumpstart the gluten development and can last from 30 minutes to 4 hours. I usually wait for about an hour.
-
Float Test: Drop a teaspoon amount of starter into a glass of water to make sure the starter is ripe and ready to be added to the Autolyse. If it sinks, cover, and check back in 30 minutes or at least it’s reached nearly to twice its original height. Use tape or marker to mark the original height of your starter.
-
Window-pane Test: After autolyze, you’d want to add in the starter, pinch to fully incorporated, and perform the windowpane test after the stretch and fold step. This is to check if the dough has built enough gluten which enables it to hold its shape.
-
Stretch and Fold is a technique that you’d want to just gently pull the dough from its bottom, stretch and let it stick on to itself. Then rotate the bowl 90 degree and repeat for about 10 minutes. This helps maintain the beautiful bubbles formed during the stretch and fold process which can take up to 2 hours with a 10-minute stretch and fold each time every 30-minute. It creates a stronger dough, and you’d know it’s done when your dough is smooth, not flattened out or sinking into your bowl. Never knead your dough!
-
Bulk rise: This is a long and slow fermentation process. It usually takes 4+ hours at room temperature or longer if you let it ferment in the fridge overnight.
-
Poke Test: Simply poke your dough to check if it’s ready to go in the oven. If it springs back right away, that means you’d have to wait for it to proof longer. If it slowly springs back and leaves a slight dent, it is ready to be scored and baked.
I hope this blog post gives you some inspiration to start making sourdough bread at home. You can watch as many technique videos as you watch. My advice is just to get in there and try it out. Don’t be afraid to make mistakes or mess it up because it’s the beauty of bread making. See it as a journey and learning process, so good luck and have fun! Leave any questions in the comment section. Take care and I’ll talk to you soon!
READ MORE:
My Favorite Kitchen Tools & Gadgets


Good luck to your blog as I continue to follow regularly.